Welcome to the BG Team page!
Please submit daily timesheet at the end of each day prior to leaving site and note any expenses for the day or materials required to complete the job.
Submit subcontractor invoices at end of trade each Friday via email to accounts@bgaudio.com.au
CONTACTS:
Accounts - 07 5661 9533 - accounts@bgaudio.com.au
Ben Graham - 0414991017 - ben@bgaudio.com.au
Jesse Lowe - 0448585077 - jesselowe@bgaudio.com.au
Tony Mansfield - 0405946095
Shane Fletcher - 0457662193 - shane@shanefletcher.media
Marty (Brisbane) - 0405359531 - incidentalartsy@gmail.com
Ebin Chacko - 0421957395 - ebasil6@gmail.com
Elijah Bellerose - 0421844393 - elijahbellerose@gmail.com
Nic Davey - 0422228480 - nic@roboticdog.com
Mike Barth - 0448066034 - barth_mike@yahoo.com
Scott Gellatly - 0414325191 - scottygellatly@gmail.com
Lachlan Dwyer - 0413268260 - lachlankdwyer@gmail.com


CONNECTOR FIT OFF
How to fit off a Cat6A connector
Fitting off a Cat6a connector involves terminating the individual wires of a Cat6a Ethernet cable to the connector to establish a reliable network connection.
Here's a step-by-step guide on how to fit off a Cat6a connector:
Strip the cable: Use a wire stripper to strip approximately 1.5 inches of the outer insulation from the end of the Cat6a Ethernet cable. This will expose the individual wire pairs inside.
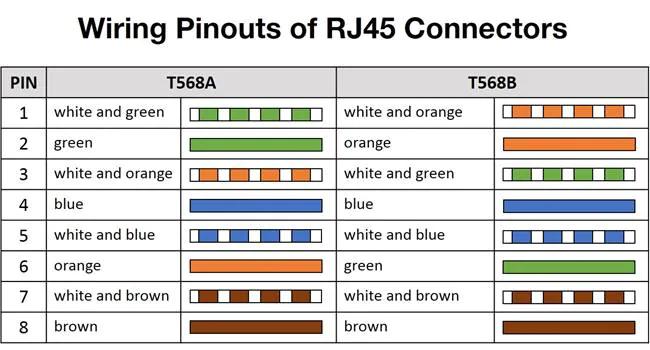
Separate the wires: Untwist the pairs of wires and separate them into their respective color-coded pairs (blue, blue/white, green, green/white, orange, orange/white, brown, and brown/white).
Arrange the wires: Arrange the wires according to the T568A or T568B wiring standard. You should choose one standard and stick to it consistently throughout your installation. T568B is the most common standard.
Trim the wires: Use wire cutters to trim the ends of each wire so that they are flush with the outer insulation of the cable.
Insert the wires into the connector: Insert the wires into the connector, following the color-coded scheme specified by the connector manufacturer. It's important to make sure that the wires are fully inserted and reach the end of the connector.
Crimp the connector: Use a crimping tool to crimp the connector onto the cable. Make sure that the connector is securely attached to the cable.
Repeat for the other end: Repeat the same process for the other end of the cable.
Test the connection: Use a cable tester to test the connection and ensure that all wires are properly connected and the network connection is established.
Note: Make sure to follow the manufacturer's instructions for the specific connector you are using, as the process may vary slightly depending on the connector. Also, it's important to use high-quality connectors and tools to ensure a reliable and long-lasting connection.
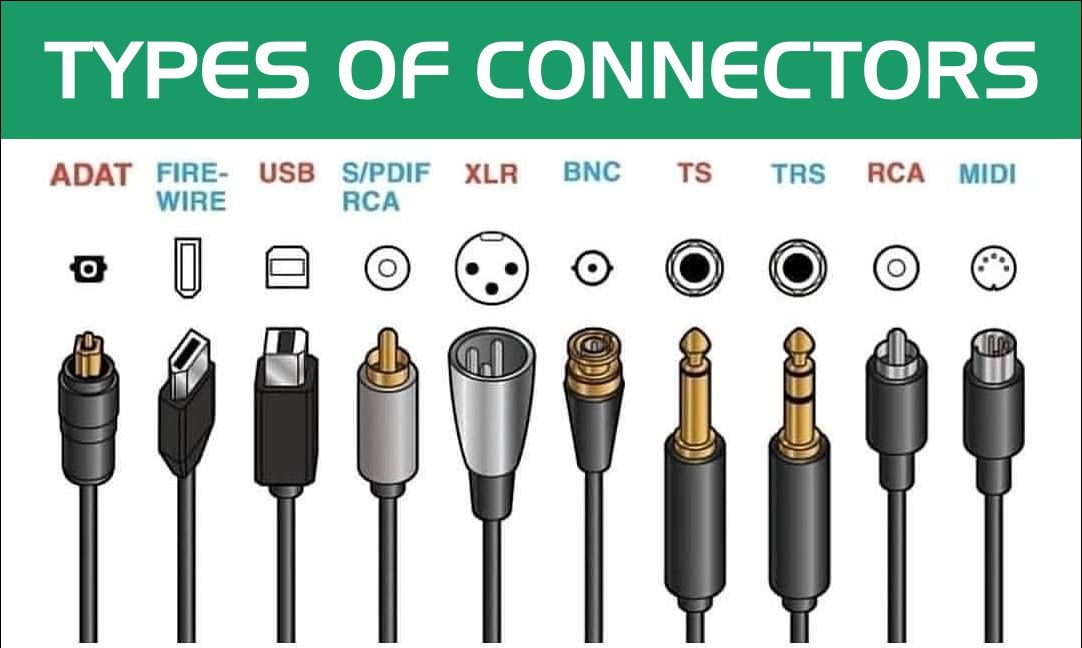
How to fit off a 3 pin XLR connector
Fitting off a 3 pin XLR connector involves terminating the wires of an audio cable to the connector to establish a reliable audio connection.
Here's a step-by-step guide on how to fit off a 3 pin XLR connector:
Strip the cable: Use a wire stripper to strip approximately 1.5 inches of the outer insulation from the end of the audio cable. This will expose the individual wire pairs inside.
Identify the wires: Identify the three wires - positive, negative, and ground - inside the cable. The positive wire is typically red, the negative wire is black, and the ground wire is usually bare or green.
Arrange the wires: Arrange the wires according to the pinout for the XLR connector you are using. The pinout will be indicated in the manufacturer's instructions.
Trim the wires: Use wire cutters to trim the ends of each wire so that they are flush with the outer insulation of the cable.
Insert the wires into the connector: Insert the wires into the appropriate pins of the XLR connector. Typically, the positive wire goes into pin 2, the negative wire goes into pin 3, and the ground wire goes into pin 1.
Secure the wires: Use a small screwdriver to tighten the set screws on the connector and secure the wires in place.
Assemble the connector: Attach the connector housing onto the connector and tighten the screws to secure it in place.
Test the connection: Use an audio tester to test the connection and ensure that there is no unwanted noise or interference.
Note: Make sure to follow the manufacturer's instructions for the specific connector you are using, as the process may vary slightly depending on the connector. Also, it's important to use high-quality connectors and tools to ensure a reliable and long-lasting connection.
How to fit off an RCA connector
Fitting off an RCA connector involves terminating the wires of an audio or video cable to the connector to establish a reliable audio or video connection.
Here's a step-by-step guide on how to fit off an RCA connector:
Strip the cable: Use a wire stripper to strip approximately 1.5 inches of the outer insulation from the end of the audio or video cable. This will expose the individual wire pairs inside.
Identify the wires: Identify the two wires - positive and negative - inside the cable. The positive wire is typically red, and the negative wire is usually white or black.
Arrange the wires: Arrange the wires according to the RCA connector you are using. Typically, the positive wire goes to the center pin, and the negative wire goes to the outer ring.
Trim the wires: Use wire cutters to trim the ends of each wire so that they are flush with the outer insulation of the cable.
Insert the wires into the connector: Insert the wires into the appropriate pins of the RCA connector. Typically, the positive wire goes into the center pin, and the negative wire goes into the outer ring.
Secure the wires: Use a small screwdriver to tighten the screws on the connector and secure the wires in place.
Assemble the connector: Attach the connector housing onto the connector and tighten the screws to secure it in place.
Test the connection: Use an audio or video tester to test the connection and ensure that there is no unwanted noise or interference.
Note: Make sure to follow the manufacturer's instructions for the specific connector you are using, as the process may vary slightly depending on the connector. Also, it's important to use high-quality connectors and tools to ensure a reliable and long-lasting connection.


